Spring Cloud Sleuth & Zipkin – Distributed Logging and Tracing


In standard applications, app logs are implemented into a single file which can be read for debugging purposes. However, apps which follows microservices architecture style comprises multiple small apps and multiple log files are to maintained to have at least one file per microservice. Due to this , identification and correlation of logs to a specific request chain becomes difficult.

For this, distributed logging & tracing mechanism can be implemented using tools like Sleuth, Zipkin, ELK etc

How to use Sleuth?

Sleuth is part of spring cloud libraries. It can be used to generate the traceid, spanid and add this information to the service calls in headers and mapped diagnostic context (MDC). These ids can be used by the tools such as Zipkin, ELK to store, index and process the log file.

To use sleuth in the app, following dependencies needs to be added

<dependency> 
<groupId>org.springframework.cloud</groupId> 
<artifactId>spring-cloud-starter-sleuth</artifactId> 
</dependency>

How to use Zipkin?

Zipkin contains two components

  • Zipkin Client
  • Zipkin Server

Zipkin client contains Sampler which collects data from ms apps with the help of sleuth and provides it the zipkin server.

To use zipkin client following dependency needs to be added in the application

<dependency> 
<groupId>org.springframework.cloud</groupId> 
<artifactId>spring-cloud-starter-zipkin</artifactId> 
</dependency>

To use zipkin server, we need to download and set up the server in our system

zipkin server

Implementation on microservice apps

To see distributed logging implementation, we need to create three services with the same configuration, the only difference has to be the service invocation details where the endpoint changes.

  • Create services as Spring boot applications with WebRest RepositoryZipkin and Sleuth dependencies.
  • Package services inside a single parent project so that three services can be built together. Also, I’ve added useful windows scripts in github repo to start/stop all the services with a single command
  • Below is one rest controller in service1 which exposes one endpoint and also invokes one downstream service using the RestTemplate. Also, we are using Sampler.ALWAYS_SAMPLE that traces each action.

Service 1

package com.mvtechbytes.service1;
 
import brave.sampler.Sampler;
import org.apache.log4j.Logger;
import org.springframework.beans.factory.annotation.Autowired;
import org.springframework.boot.SpringApplication;
import org.springframework.boot.autoconfigure.SpringBootApplication;
import org.springframework.context.annotation.Bean;
import org.springframework.core.ParameterizedTypeReference;
import org.springframework.http.HttpMethod;
import org.springframework.web.bind.annotation.GetMapping;
import org.springframework.web.bind.annotation.RestController;
import org.springframework.web.client.RestTemplate;
 
@SpringBootApplication
public class Service1Application {
 
    public static void main(String[] args) {
        SpringApplication.run(Service1Application.class, args);
    }
}
 
@RestController
class Service1Controller {

    private static final Logger LOG = Logger.getLogger(Service1Controller.class.getName());
     
    @Autowired
    RestTemplate restTemplate;
 
    @Bean
    public RestTemplate getRestTemplate() {
        return new RestTemplate();
    }
 
    @Bean
    public Sampler alwaysSampler() {
        return Sampler.ALWAYS_SAMPLE;
    }
     
    @GetMapping(value="/service1")
    public String service1() 
    {
        LOG.info("Inside Service 1..");         
String response = (String)   restTemplate.exchange("http://localhost:8082/service2", HttpMethod.GET, null, new ParameterizedTypeReference<String>() {}).getBody();
        return response;
    }
}

Appication Configuration

As all services will run in a single machine, so we need to run them in different ports. Also to identify in Zipkin, we need to give proper names. so configure the application name and port information in application.properties file under the resources folder.

application.propertiesserver.port = 8081
spring.application.name = zipkin-server1

Similarly, for the other 2 services, we will use ports 8082, 8083 and their name will also be zipkin-server2 and zipkin-server3

Also, we have intentionally introduced a delay in the second service so that we can view that in Zipkin.

Above project is available in below github location

Github repo : https://github.com/mvtechbytes/Zipkin-Sleuth

On running app using bat files

Find Traces
Individual Trace
Trace details

References

Spring Boot and Zuul API Gateway Integration


In this post, we will learn how to integrate zuul api gateway to the application developed in microservices architecture.

Our application consists of below components

  • customer-service
  • order-service
  • eureka-server
  • zuul-service

We have already seen how to create customer-service, order-service, eureka-server in the previous post given below

https://malliktalksjava.com/2020/05/28/spring-boot-netflix-eureka-integration/

Let us start integrating zuul api gateway service to the above application.

Firstly, Go to https://start.spring.io , Create SpringBoot Application with below configuration. 

As shown above, Spring Web, Eureka Server, Zuul as dependencies needs to be added.

Second Step, Import the project in the Eclipse, go to application.properties and add below properties

spring.application.name=zuul-service
zuul.routes.order.url=http://localhost:8080
eureka.client.serviceUrl.defaultZone=http://localhost:8090/eureka
server.port=8079

Next step is to create following filters

  • ErrorFilter
  • PreFilter
  • PostFilter
  • RouteFilter

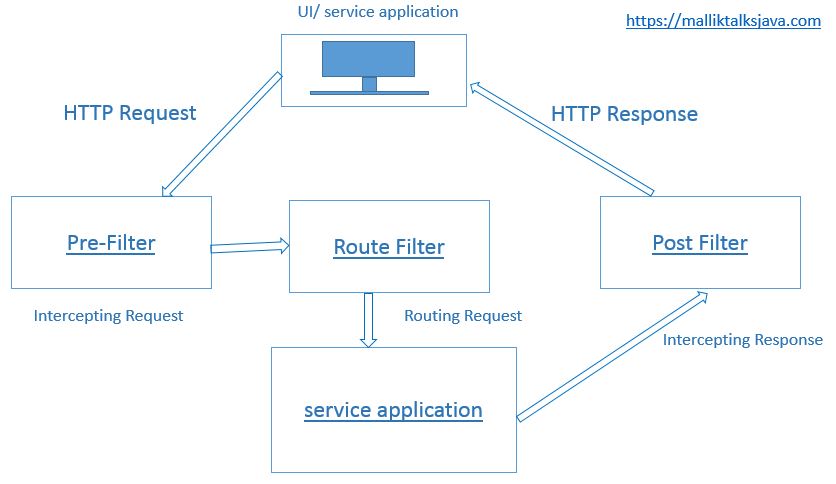
Below diagram depicts flow of Request & Response intercepted by Zuul filters

Zuul_FlowDFilters creation step 1: Create ErrorFilter by extending ZuulFilter and override methods and shown below

package com.venkat.filters;

import com.netflix.zuul.ZuulFilter;

public class ErrorFilter extends ZuulFilter {

@Override
public String filterType() {
        return "error";
}

@Override
public int filterOrder() {
       return 0;
}

@Override
public boolean shouldFilter() {
       return true;
}

@Override
public Object run() {
        System.out.println(" ############# Using Error Filter ##################");               
return null;
}

}

Filters creation step 2: Create PreFilter by extending ZuulFilter and override methods and shown below

package com.venkat.filters;
import javax.servlet.http.HttpServletRequest;
import com.netflix.zuul.ZuulFilter;
import com.netflix.zuul.context.RequestContext;

public class PreFilter extends ZuulFilter {

@Override
public String filterType() {
return "pre";
}

@Override
public int filterOrder() {
return 0;
}

@Override
public boolean shouldFilter() {
return true;
}

@Override
public Object run() {
RequestContext ctx = RequestContext.getCurrentContext();
HttpServletRequest request = ctx.getRequest();
System.out.println(" ############# In Pre Filter ################## ");
System.out.println(
"Request Method : " + request.getMethod() + " Request URL : " + request.getRequestURL().toString());

return null;
}

}

Filters creation step 3: Create PostFilter by extending ZuulFilter and override methods and shown below

package com.venkat.filters;

import java.io.IOException;
import java.io.InputStreamReader;
import javax.servlet.http.HttpServletRequest;
import javax.servlet.http.HttpServletResponse;
import com.google.common.io.CharStreams;
import com.netflix.zuul.ZuulFilter;
import com.netflix.zuul.context.RequestContext;

public class PostFilter extends ZuulFilter {

@Override
public String filterType() {
return "post";
}

@Override
public int filterOrder() {
return 0;
}

@Override
public boolean shouldFilter() {
return true;
}

@Override
public Object run() {
RequestContext ctx = RequestContext.getCurrentContext();
System.out.println(" ############# In Post Filter ################## ");
try {
System.out.println(
"Response Status Code : " + ctx.getResponseStatusCode() + " Response Body : " + CharStreams.toString(new InputStreamReader(ctx.getResponseDataStream(), "UTF-8")));
} catch (IOException e) {

}

return null;
}

}

Filters creation step 4: Create RouteFilter by extending ZuulFilter and override methods and shown below

package com.venkat.filters;

import com.netflix.zuul.ZuulFilter;

public class RouteFilter extends ZuulFilter {

@Override
public String filterType() {
return "route";
}

@Override
public int filterOrder() {
return 0;
}

@Override
public boolean shouldFilter() {
return true;
}

@Override
public Object run() {
System.out.println("Using Route Filter");

return null;
}

}

Next, Add @EnableZuulProxy to ZuulProxyApplication class in zuul-service and add bean configurations for Filters which we have created as shown below

package com.venkat;

import org.springframework.boot.SpringApplication;
import org.springframework.boot.autoconfigure.SpringBootApplication;
import org.springframework.cloud.netflix.eureka.EnableEurekaClient;
import org.springframework.cloud.netflix.zuul.EnableZuulProxy;
import org.springframework.context.annotation.Bean;

@SpringBootApplication
@EnableEurekaClient
@EnableZuulProxy
public class ZuulProxyApplication {

public static void main(String[] args) {
SpringApplication.run(ZuulProxyApplication.class, args);
}

@Bean
public PreFilter preFilter() {
return new PreFilter();
}

@Bean
public PostFilter postFilter() {
return new PostFilter();
}

@Bean
public ErrorFilter errorFilter() {
return new ErrorFilter();
}

@Bean
public RouteFilter routeFilter() {
return new RouteFilter();
}
}

Once we are done creating all the filters package structure of our
zuul-service will be as shown as shown below

Now we will see changes to done to the customer-service application to enable requests
pass via zuul-service filters.

Go to CusomerControllerClient.java in customer-service replace

List<ServiceInstance> instances = discoveryClient.getInstances("ORDER-SERVICE");

with

List<ServiceInstance> instances = discoveryClient.getInstances("ZUUL-SERVICE");

and 

String completeURL = baseURL + "/customerorder";

with 

String completeURL = baseURL + "/order/customerorder";

Upon completion of all the code changes/additons discussed above run all the services, eureka-server, order-service, customer-service, zuul-service.

Following will be output once we hit the REST endpoint /customerorderinfo

zuul-service logs on hitting the REST end point are given below, clearly we can see both Request and Response pass through Pre, Route, Post Filters 

############# In Pre Filter ################## 
Request Method : GET Request URL : http://Dell:8079/order/customerorder
Using Route Filter
############# In Post Filter ##################
Response Status Code : 200 Response Body : {"orderId":"TIF567","itemName":"Dosa","itemType":"Tiffin","cost":40.0}
2020-05-31 18:56:18.494 INFO 3892 --- [trap-executor-0] c.n.d.s.r.aws.ConfigClusterResolver : Resolving eureka endpoints via configuration
############# In Pre Filter ##################
Request Method : GET Request URL : http://Dell:8079/order/customerorder
Using Route Filter
############# In Post Filter ##################
Response Status Code : 200 Response Body : {"orderId":"TIF567","itemName":"Dosa","itemType":"Tiffin","cost":40.0}

Conclusion

In this post, we have seen how to configure Zuul-proxy and make requests from one microservice pass through customized zuul filters. These filters enable us to apply functionality to our edge service. These filters help us perform the following functions:

  • Authentication & Security – identifying authentication requirements for each resource and rejecting requests that do not satisfy them.
  • Monitoring – tracking data and statistics at the edge which gives us a view of production.
  • Dynamic Routing – dynamically routing requests to various back-end clusters.
  • Load Shedding – allocating capacity for each type of request and dropping requests that exceeds the limit set.
  • Stress Testing – increasing the traffic to a cluster to measure its performance.
  • Static Response handling – sending some responses directly at the edge instead of forwarding them to an internal cluster.

Related links:

References:

Spring Boot and Netflix Eureka Integration


In this post we will learn how to integrate applications developed in Spring Boot with Netflix Eureka.

First step is to create two Spring Boot application services

  • customer-service
  • order-service

Go to https://start.spring.io and create order-service app using below config details.

Mainly for our use case, adding Spring Web, Eureka Server dependencies are the required ones

Likewise, create customer-service app with same config details used for order-service by adding Spring Web, Eureka Server dependencies.

Next, create eureka-server app with below config . Adding Eureka Server is main important config for our use case

Next, Import the projects created from the above into Eclipse IDE.

Add @EnableEurekaServer on EurekaServerApplication class as shown Below

package com.venkat;

@SpringBootApplication
@EnableEurekaServer
public class EurekaServerApplication {

public static void main(String[] args) {
SpringApplication.run(EurekaServerApplication.class, args);
}
}

Add below properties to the application.properties

server.port=8090
eureka.client.register-with-eureka=false
eureka.client.fetch-registry=false

Next, Add @EnableEurekaClient on CustomerServiceApplication class in customer-service  app as shown below

@SpringBootApplication
@EnableEurekaClient
public class CustomerServiceApplication {
public static void main(String[] args) throws RestClientException, IOException {
SpringApplication.run(CustomerServiceApplication.class, args);
}

@Bean
public ConsumerControllerClient consumerControllerClient()
{
return new ConsumerControllerClient();
}
}

Likewise, Add @EnableEurekaClient on OrderServiceApplication class in order-service app as shown below

@SpringBootApplication
@EnableEurekaClient
public class OrderSerivceApplication {

public static void main(String[] args) {
SpringApplication.run(OrderSerivceApplication.class, args);
}
}

Next, Add below configuration in customer-service and order-service
application.properties files

customer-service

spring.application.name=customer-service
server.port=8091
eureka.client.serviceUrl.defaultZone=http://localhost:8090/eureka

order-service

spring.application.name=order-service
server.port=8080
eureka.client.serviceUrl.defaultZone=http://localhost:8090/eureka

Next, Create Order.java in model package as shown below with orderId, itemName, itemType, Cost attributes.

package com.venkat.model;

public class Order {
private String orderId;
private String itemName;
private String itemType;
private double cost;

public Order() {
}

public String getOrderId() {
return orderId;
}

public void setOrderId(String orderId) {
this.orderId = orderId;
}

public String getItemName() {
return itemName;
}

public void setItemName(String itemName) {
this.itemName = itemName;
}

public String getItemType() {
return itemType;
}

public void setItemType(String itemType) {
this.itemType = itemType;
}

public double getCost() {
return cost;
}

public void setCost(double cost) {
this.cost = cost;
}
}

Create OrderController with a REST GET mapping for /customerorder to return Order object

package com.venkat.controllers;

import org.springframework.web.bind.annotation.RequestMapping;
import org.springframework.web.bind.annotation.RequestMethod;
import org.springframework.web.bind.annotation.RestController;

import com.venkat.model.Order;

@RestController
public class OrderController {

@RequestMapping(value = "/customerorder", method = RequestMethod.GET)
public Order customerOrder() {
Order order = new Order();
order.setOrderId("TIF567");
order.setItemName("Dosa");
order.setItemType("Tiffin");
order.setCost(40.00);
return order;
}
}

Create a ConsumerControllerClient.java class as shown below

package com.venkat.controllers;

import java.io.IOException;
import java.util.List;

import org.springframework.beans.factory.annotation.Autowired;
import org.springframework.cloud.client.ServiceInstance;
import org.springframework.cloud.client.discovery.DiscoveryClient;
import org.springframework.http.HttpEntity;
import org.springframework.http.HttpHeaders;
import org.springframework.http.HttpMethod;
import org.springframework.http.MediaType;
import org.springframework.http.ResponseEntity;
import org.springframework.stereotype.Controller;
import org.springframework.web.bind.annotation.GetMapping;
import org.springframework.web.bind.annotation.RestController;
import org.springframework.web.client.RestClientException;
import org.springframework.web.client.RestTemplate;

@RestController
public class ConsumerControllerClient {

@Autowired
private DiscoveryClient discoveryClient;

@GetMapping(path="/customerorderinfo")
public String getCustomerOrder() throws RestClientException, IOException {

List<ServiceInstance> instances = discoveryClient.getInstances("ORDER-SERVICE");

// Creating URL for calling order-service
ServiceInstance serviceInstance = instances.get(0);
String baseURL = serviceInstance.getUri().toString();
String completeURL = baseURL + "/customerorder";

// Calling order-service
RestTemplate restTemplate = new RestTemplate();
ResponseEntity<String> response = null;
try {
response = restTemplate.exchange(completeURL, HttpMethod.GET, getHeaders(), String.class);
} catch (Exception ex) {
System.out.println(ex);
}
System.out.println(response.getBody());
return response.getBody();
}

private static HttpEntity<?> getHeaders() throws IOException {
HttpHeaders headers = new HttpHeaders();
headers.set("Accept", MediaType.APPLICATION_JSON_VALUE);
return new HttpEntity<>(headers);
}

}

Final step is to Run EurekaServer, order-service, customer-service apps

Open http://localhost:8090 (port on which eureka server is running). Here you will see
order-service,customer-service app instances registered with it.

Output on hitting REST Endpoint http://localhost:8091/customerorderinfo is given below

Conclusion

In the above post we have seen how to register two service applications with Netflix Eureka
Server and communicate between the services via Eureka server registry without knowing the
host, port info of the service to which we are communicating with.

Spring Boot Starter dependencies


Spring Boot provides a number of starters which allow us to add jars in the classpath. Spring Boot Starters are the dependency descriptors. Spring Boot built-in starters make development easier, rapid and easily maintainable.

Naming Pattern

In the Spring Boot framework, all the starters follow a similar naming pattern: spring-boot-starter-*, where * denotes a particular type of application.

Example, if we require to use Spring and JPA for database access, spring-boot-starter-data-jpa dependency in our pom.xml file of the project can be included.

<dependency>
<groupId>org.springframework.boot</groupId>
<artifactId>spring-boot-starter-data-jpa</artifactId>
</dependency>

If we are developing REST API, spring-boot-starter-web dependency can be used.

<dependency>
<groupId>org.springframework.boot</groupId>
<artifactId>spring-boot-starter-web</artifactId>
</dependency>

If gradle is being used as build tool, then following can be added to build.gradle file in the project.

dependencies {
implementation 'org.springframework.boot:spring-boot-starter-data-jpa'
implementation 'org.springframework.boot:spring-boot-starter-web'
}

Below are the jars which are added to project’s classpath on adding “spring-boot-starter-data-jpa”

Spring Boot Starters can be broadly classified into three categories

  1. Production Starters
  2. Application Starters
  3. Technical Starters

Below is complete list of the starters available in above categories

Spring Boot Production Starters

Name

Description

spring-boot-starter-actuator This provides production-ready features to help you monitor and manage your application.
spring-boot-starter-remote-shell This is used for the CRaSH remote shell to monitor and manage your application over SSH. Deprecated since 1.5.

Spring Boot Application Starters

Name

Description

spring-boot-starter-thymeleaf For building MVC web applications using Thymeleaf views.
spring-boot-starter-data-couchbase For the Couchbase document-oriented database and Spring Data Couchbase.
spring-boot-starter-artemis For JMS messaging using Apache Artemis.
spring-boot-starter-web-services For Spring Web Services.
spring-boot-starter-mail To support Java Mail and Spring Framework’s email sending.
spring-boot-starter-data-redis Used for Redis key-value data store with Spring Data Redis and the Jedis client.
spring-boot-starter-web For building the web application, including RESTful applications using Spring MVC. It uses Tomcat as the default embedded container.
spring-boot-starter-data-gemfire Used to GemFire distributed data store and Spring Data GemFire.
spring-boot-starter-activemq For JMS messaging using Apache ActiveMQ.
spring-boot-starter-data-elasticsearch For Elasticsearch search and analytics engine and Spring Data Elasticsearch.
spring-boot-starter-integration It is used for Spring Integration.
spring-boot-starter-test Used to test Spring Boot applications with libraries, including JUnit, Hamcrest, and Mockito.
spring-boot-starter-jdbc Used for JDBC with the Tomcat JDBC connection pool.
spring-boot-starter-mobile Used for building web applications using Spring Mobile.
spring-boot-starter-validation Used for Java Bean Validation with Hibernate Validator.
spring-boot-starter-hateoas Used to build a hypermedia-based RESTful web application with Spring MVC and Spring HATEOAS.
spring-boot-starter-jersey Used to build RESTful web applications using JAX-RS and Jersey. An alternative to spring-boot-starter-web.
spring-boot-starter-data-neo4j Used for the Neo4j graph database and Spring Data Neo4j.
spring-boot-starter-data-ldap Used for Spring Data LDAP.
spring-boot-starter-websocket Used for building the WebSocket applications. It uses Spring Framework’s WebSocket support.
spring-boot-starter-aop For aspect-oriented programming with Spring AOP and AspectJ.
spring-boot-starter-amqp For Spring AMQP and Rabbit MQ.
spring-boot-starter-data-cassandra For Cassandra distributed database and Spring Data Cassandra.
spring-boot-starter-social-facebook For Spring Social Facebook.
spring-boot-starter-jta-atomikos For JTA transactions using Atomikos.
spring-boot-starter-security It is used for Spring Security.
spring-boot-starter-mustache It is used for building MVC web applications using Mustache views.
spring-boot-starter-data-jpa Used for Spring Data JPA with Hibernate.
spring-boot-starter Used for core starter, including auto-configuration support, logging, and YAML.
spring-boot-starter-groovy-templates Used for building MVC web applications using Groovy Template views.
spring-boot-starter-freemarker It is used for building MVC web applications using FreeMarker views.
spring-boot-starter-batch For Spring Batch.
spring-boot-starter-social-linkedin For Spring Social LinkedIn.
spring-boot-starter-cache For Spring Framework’s caching support.
spring-boot-starter-data-solr It is used for the Apache Solr search platform with Spring Data Solr.
spring-boot-starter-data-mongodb It is used for MongoDB document-oriented database and Spring Data MongoDB.
spring-boot-starter-jooq Used for jOOQ to access SQL databases. An alternative to spring-boot-starter-data-jpa or spring-boot-starter-jdbc.
spring-boot-starter-jta-narayana Used for Spring Boot Narayana JTA Starter.
spring-boot-starter-cloud-connectors It is used for Spring Cloud Connectors that simplifies connecting to services in cloud platforms like Cloud Foundry and Heroku.
spring-boot-starter-jta-bitronix It is used for JTA transactions using Bitronix.
spring-boot-starter-social-twitter For Spring Social Twitter.
spring-boot-starter-data-rest For exposing Spring Data repositories over REST using Spring Data REST.

Spring Boot Technical Starters

Name Description
spring-boot-starter-undertow Used for Undertow as the embedded servlet container. An alternative to spring-boot-starter-tomcat.
spring-boot-starter-jetty Used for Jetty as the embedded servlet container. An alternative to spring-boot-starter-tomcat.
spring-boot-starter-logging Used for logging using Logback. Default logging starter.
spring-boot-starter-tomcat Used for Tomcat as the embedded servlet container. Default servlet container starter used by spring-boot-starter-web.
spring-boot-starter-log4j2 Used for Log4j2 for logging. An alternative to spring-boot-starter-logging.

Spring Security Namespace Designs


The namespace is designed to capture the most common uses of the framework and provide a simplified and concise syntax for enabling them within an application. The design is based around the large-scale dependencies within the framework, and can be divided up into the following areas:

  • Web/HTTP Security – the most complex part. Sets up the filters and related service beans used to apply the framework authentication mechanisms, to secure URLs, render login and error pages and much more.
  • Business Object (Method) Security – options for securing the service layer.
  • AuthenticationManager – handles authentication requests from other parts of the framework.
  • AccessDecisionManager – provides access decisions for web and method security. A default one will be registered, but you can also choose to use a custom one, declared using normal Spring bean syntax.
  • AuthenticationProviders – mechanisms against which the authentication manager authenticates users. The namespace provides supports for several standard options and also a means of adding custom beans declared using a traditional syntax.
  • UserDetailsService – closely related to authentication providers, but often also required by other beans.

Features of Spring Web MVC


Spring’s web module includes many unique web support features:

  • Clear separation of roles. Each role—controller, validator, command object, form object, model object, DispatcherServlet, handler mapping, view resolver, and so on—can be fulfilled by a specialized object.
  • Powerful and straightforward configuration of both framework and application classes as JavaBeans. This configuration capability includes easy referencing across contexts, such as from web controllers to business objects and validators.
  • Adaptability, non-intrusiveness, and flexibility. Define any controller method signature you need, possibly using one of the parameter annotations (such as @RequestParam, @RequestHeader, @PathVariable, and more) for a given scenario.
  • Reusable business code, no need for duplication. Use existing business objects as command or form objects instead of mirroring them to extend a particular framework base class.
  • Customizable binding and validation. Type mismatches as application-level validation errors that keep the offending value, localized date and number binding, and so on instead of String-only form objects with manual parsing and conversion to business objects.
  • Customizable handler mapping and view resolution. Handler mapping and view resolution strategies range from simple URL-based configuration, to sophisticated, purpose-built resolution strategies. Spring is more flexible than web MVC frameworks that mandate a particular technique.
  • Flexible model transfer. Model transfer with a name/value Map supports easy integration with any view technology.
  • Customizable locale, time zone and theme resolution, support for JSPs with or without Spring tag library, support for JSTL, support for Velocity without the need for extra bridges, and so on.
  • A simple yet powerful JSP tag library known as the Spring tag library that provides support for features such as data binding and themes. The custom tags allow for maximum flexibility in terms of markup code.
  • A JSP form tag library, introduced in Spring 2.0, that makes writing forms in JSP pages much easier.
  • Beans whose lifecycle is scoped to the current HTTP request or HTTP Session. This is not a specific feature of Spring MVC itself, but rather of the WebApplicationContext container(s) that Spring MVC uses.

Methods of Bean Configurations for Spring Container


There are three ways to provide the configuration metadata to Spring container. Below are the more details about them.

1. Xml based configuration file

<?xml version=”1.0″ encoding=”UTF-8″?>

<beans xmlns=”http://www.springframework.org/schema/beans&#8221;
xmlns:xsi=”http://www.w3.org/2001/XMLSchema-instance&#8221;
xsi:schemaLocation=”http://www.springframework.org/schema/beans
http://www.springframework.org/schema/beans/spring-beans-3.0.xsd”&gt;

<!– A simple bean definition –>
<bean id=”…” class=”…”>
<!– collaborators and configuration for this bean go here –>
</bean>

<!– A bean definition with lazy init set on –>
<bean id=”…” class=”…” lazy-init=”true”>
<!– collaborators and configuration for this bean go here –>
</bean>

<!– A bean definition with initialization method –>
<bean id=”…” class=”…” init-method=”…”>
<!– collaborators and configuration for this bean go here –>
</bean>

<!– A bean definition with destruction method –>
<bean id=”…” class=”…” destroy-method=”…”>
<!– collaborators and configuration for this bean go here –>
</bean>

<!– more bean definitions go here –>

</beans>

2. Annotation based configuration

<?xml version=”1.0″ encoding=”UTF-8″?>

<beans xmlns=”http://www.springframework.org/schema/beans&#8221;
xmlns:xsi=”http://www.w3.org/2001/XMLSchema-instance&#8221;
xmlns:context=”http://www.springframework.org/schema/context&#8221;
xsi:schemaLocation=”http://www.springframework.org/schema/beans
http://www.springframework.org/schema/beans/spring-beans-3.0.xsd
http://www.springframework.org/schema/context
http://www.springframework.org/schema/context/spring-context-3.0.xsd”&gt;

<context:annotation-config/>
<!– bean definitions go here –>

<bean id=”empAddress” class=”in.malliktalksjava.spring.samples.EmployeeAddress” />

</beans>

Once <context:annotation-config/> is configured, you can start annotating your code to indicate that Spring should automatically wire values into properties, methods, and constructors. Once you add the annotation config, you can use @Autowired annotation as below on setter methods to get rid of the <property> element in XML configuration file. When Spring finds an @Autowired annotation used with setter methods, it tries to perform byType autowiring on the method.

Employee.java:

package in.malliktalksjava.spring.samples;

public class Employee{

@Autowired

public EmployeeAddress empAddress;

public void test(){

System.out.println(empAddress.getStreet());

System.out.println(empAddress.getPostalCode());

}

}

EmployeeAddress.java:

package in.malliktalksjava.spring.samples;

public class EmployeeAddress{

private String street;

private String postalCode;

public void setStreet(String street){

this.street = street;

}

public String getStreet(){

return street;

}

public void setPostalCode(String postalCode)

this.postalCode = postalCode;

}

public String getPostalCode(){

return postalCode;

}

}


3. Java based configuration

Java based configuration option enables you to write most of your Spring configuration without XML but with the help of few Java-based annotations. Annotating a class with the @Configuration indicates that the class can be used by the Spring IoC container as a source of bean definitions. The @Bean annotation tells Spring that a method annotated with @Bean will return an object that should be registered as a bean in the Spring application context.

HelloWorldConfig.java

package in.malliktalksjava.spring.samples;
import org.springframework.context.annotation.*;

@Configuration
public class HelloWorldConfig {

@Bean
public HelloWorld helloWorld(){
return new HelloWorld();
}
}

HelloWorld.java

package in.malliktalksjava.spring.samples;

public class HelloWorld {
private String message;

public void setMessage(String message){
this.message = message;
}

public void getMessage(){
System.out.println(” Message is : ” + message);
}
}

MainApp.java:

package in.malliktalksjava.spring.samples;

import org.springframework.context.ApplicationContext;
import org.springframework.context.annotation.*;

public class MainApp {
public static void main(String[] args) {
ApplicationContext ctx =
new AnnotationConfigApplicationContext(HelloWorldConfig.class);

HelloWorld helloWorld = ctx.getBean(HelloWorld.class);

helloWorld.setMessage(“Hello World!”);
helloWorld.getMessage();
}
}

Complete application has been created without writing any configuration file.

Spring Bean Scopes – Examples


There are 5 spring bean scopes as below:

1. Singleton: 

If scope is set to singleton, the Spring IoC container creates exactly one instance of the object defined by that bean definition. This single instance is stored in a cache of such singleton beans, and all subsequent requests and references for that named bean return the cached object.

If we not set any scope to bean then spring container will set to the default scope and default scope of the bean is always singleton. use ‘singleton’ to set the bean scope to Singleton.

2. Prototype

If scope is set to prototype, the Spring IoC container creates new bean instance of the object every time a request for that specific bean is made.

Use ‘prototype’ word during spring configuration to set the bean scope to Proto Type.

As a rule, use the prototype scope for all state-full beans and the singleton scope for stateless beans.

3. Request:

This scopes a bean definition to an HTTP Request and its only valid in the context of a web-aware Spring ApplicationContext.

Use the ‘request’ keyword to set the bean scope to HttpRequest during spring bean configuration.

4. Session:

This scopes a bean definition to an HTTP Session and its only valid in the context of a web-aware Spring ApplicationContext.

Use the ‘session’ keyword to set the bean scope to Http Session during spring bean configuration.

5. Global Session

This scopes a bean definition to a Global HTTP Session and its only valid in the context of a web-aware Spring ApplicationContext.

Use the ‘global-session’ keyword to set the bean scope to Global Http Session during spring bean configuration.

Configuration of these scopes can be done as below:

Define the above mentioned scopes in beans.xml file along with bean declaration.

<!– A bean definition with singleton scope –>
<bean id=”…” class=”…” scope=”singleton”>
<!– collaborators and configuration for this bean go here –>
</bean>

Can also be mention the bean scope using annotation:

@Configuration
public class BeanJavaConfiguration {
@Bean
@Scope(“prototype”)
public Appleapp() {
return new Apple();
}
}


How to Inject Null or Blank values to a Spring Bean


To inject an NULL value which is equivalent to bean.setMessage(null):

<bean id=”beanId” class=”bean”>
<property name=”message”><null/></property>
</bean>

To inject an empty Stringe which is equivalent to bean.setMessage(“”)

<bean id=”beanId” class=”bean”>
<property name=”message” value=””></property>
</bean>


Different Types of Spring Containers


There are two distinct types of spring containers as mentioned below:

1. BeanFactory Container:

  • This is the simplest container providing basic support for Dependency Injection and defined by the org.springframework.beans.factory.BeanFactory interface. Related interfaces, such as BeanFactoryAware, InitializingBean, DisposableBean, can provide callbacks which can be configured for the different phases of the Spring Bean’s life cycle.
  • BeanFactory, by default lazy loads the beans, it creates the bean only when the getBean() method is called.

2. ApplicationContext Container:

  • This container adds more enterprise-specific functionalities such as ability to resolve textual messages from a properties file and ability to publish application events to the interested event listeners. This container is defined by org.springframework.context.ApplicationContext interface.
  • ApplicationContext loads all Spring Beans upon start-up unlike BeanFactory.

ApplicationContext container includes all functionality of the BeanFactory container, so it is generally recommended over the BeanFactory. BeanFactory can be used for light weight applications like mobile devices or applet based applications where data volume and speed is significant.